Seed Starting 101
Supplies:
- Clean cells, trays, and domes
- Sterile Seed Starting or Seedling soil
- or Jiffy Pellets
- Seeds
- Spray bottle or mister
Old cells, trays, and domes can be reused from year to year but they do need to be sterilized first.
Wash them well with hot soapy water and then:
- spray them thoroughly with hydrogen peroxide and let sit to dry for about 20 minutes OR
- soak them in a bleach solution of 1 part bleach to 9 parts water for 15-20 minutes.
Seed Starting Soil– It is important to use a seedling or a seed starting mix that is formulated for specifically starting seeds. Sometimes regular garden soil drains poorly in small cell trays. Other recommended soils would be Pro-Mix or Happy Frog Soil.
Jiffy Pellets– Soak in warm water for 15-20 mins.
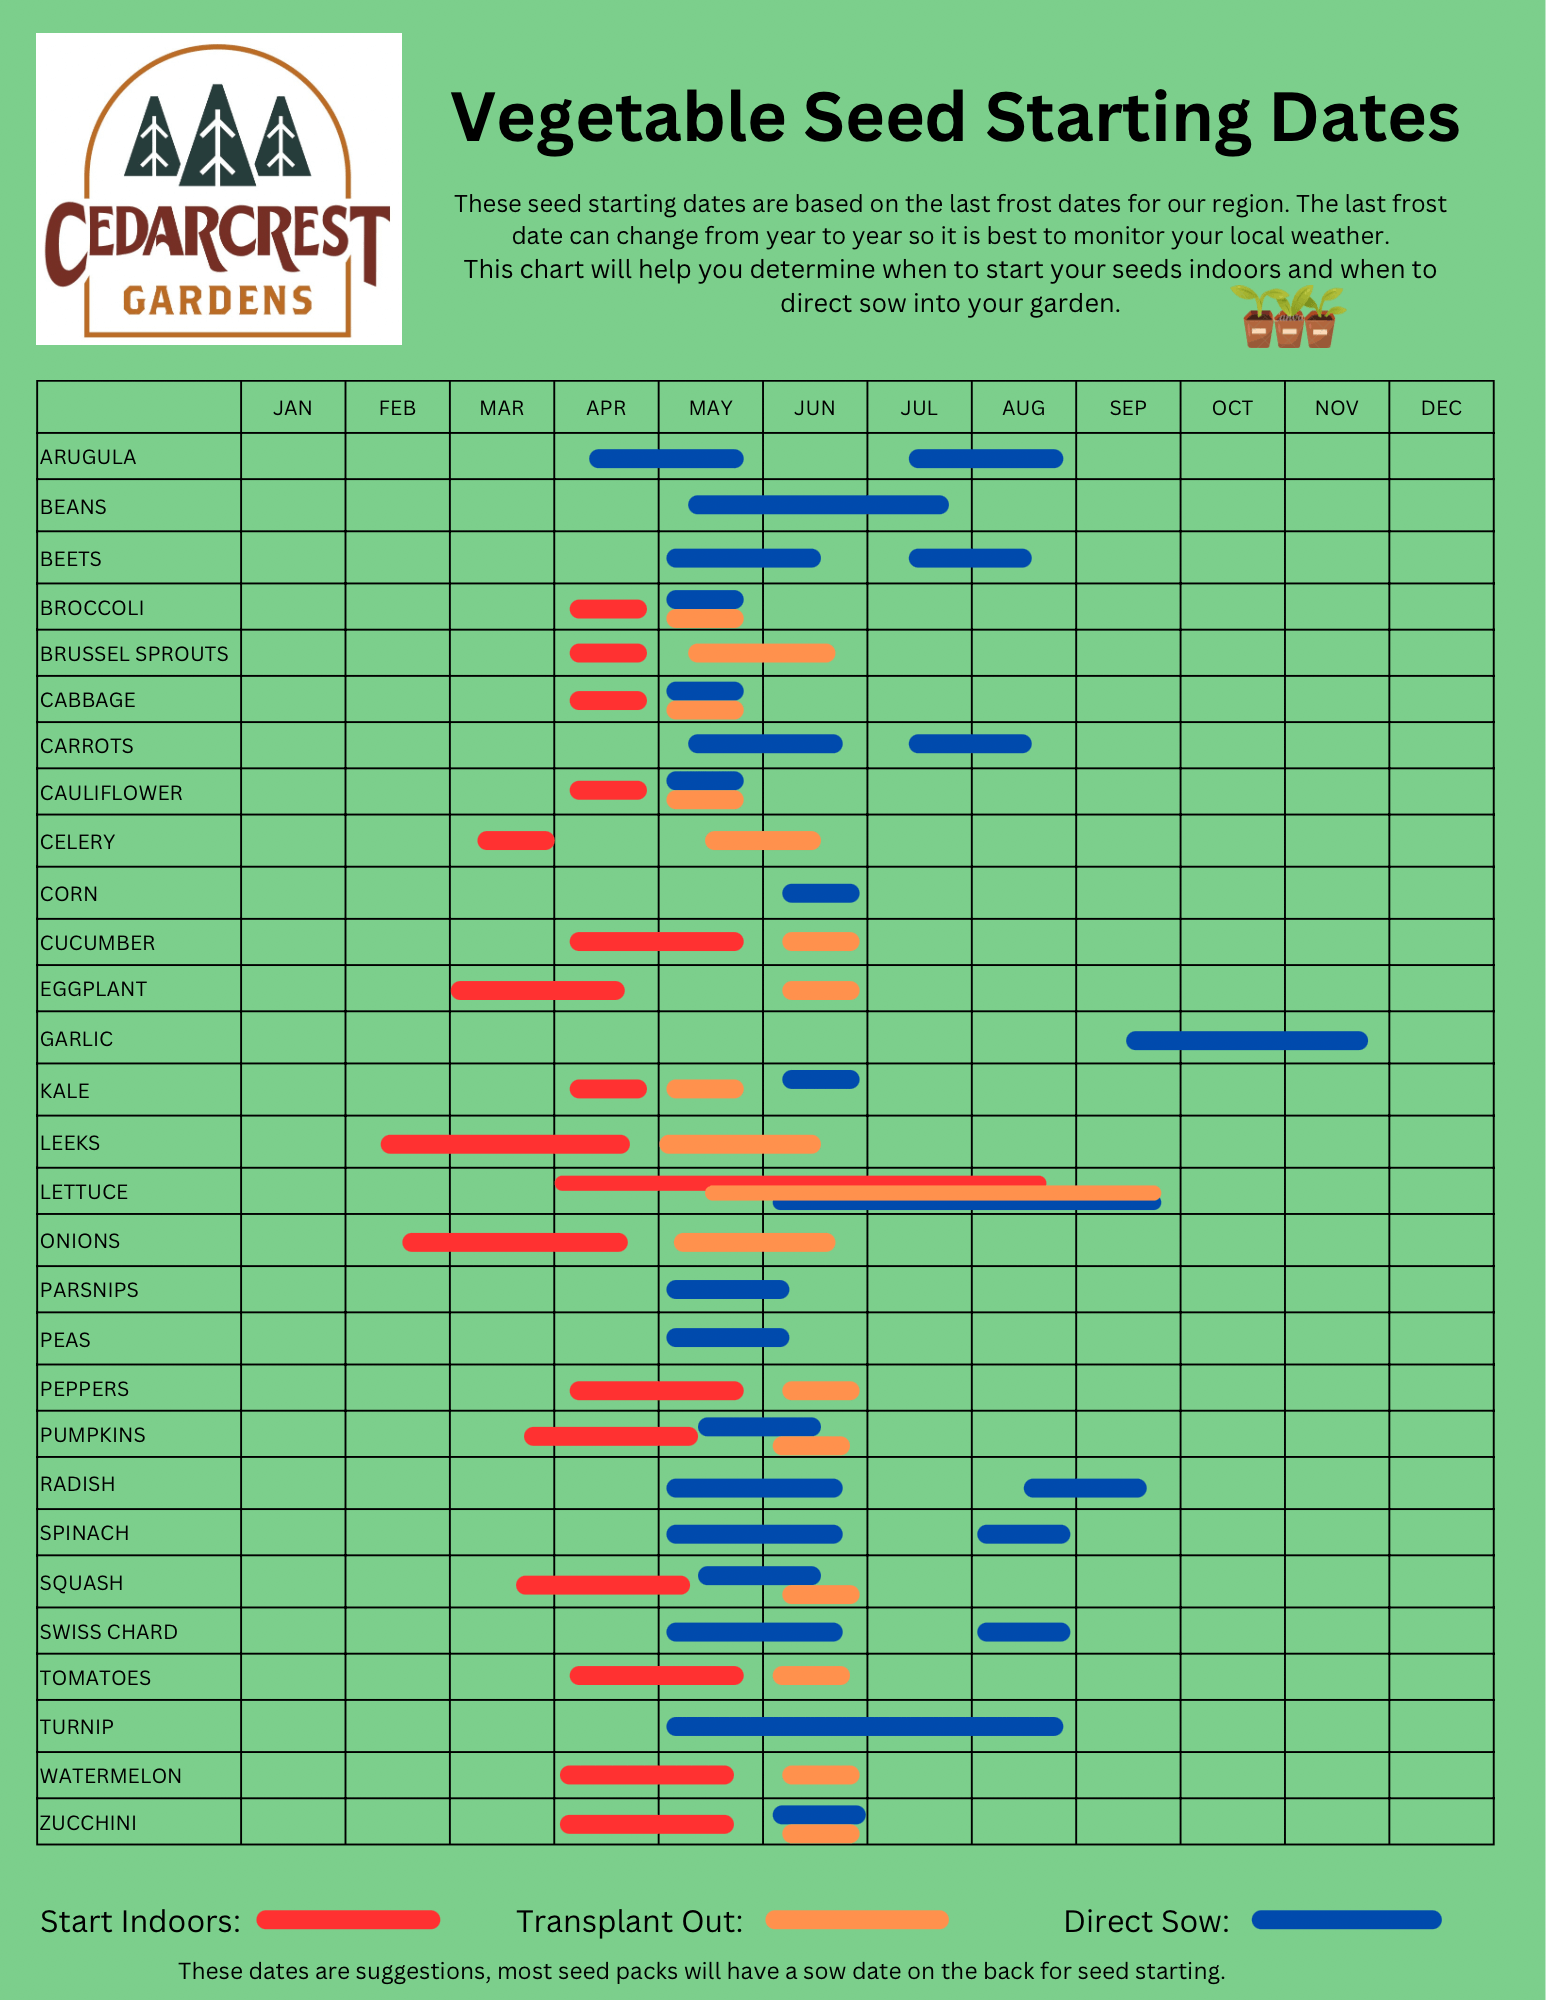
Seeds– Seed packages will tell you how many weeks in advance to start your seeds indoors or you can use our Seed Starting Guide.
Planting– Fill cell trays with moist (not soaked) seed starting soil, gently tap but do not pack down, you want to soil to remain light and fluffy.
- Plant 2-3 seeds per cell, generally double their width deep. Seeds only contain enough energy to nourish it while germinating, if they are planted too deep they run out of energy before reaching the light & grow big enough to produce their own
- Water- Spray bottles work great because keeping the soil moist is the key to germination. Once seedlings are a bit older, then you can use a small watering can that provides a gentle stream. Bottom water is the best method, it helps to keep the top of the soil dryer, helping prevent disease problems such as damping off
- Cover with a dome- These domes help create a “Greenhouse Effect” retaining heat and moisture that help to promote germination. As soon as you see your first tiny sprout, remove the cover. This allows air to circulate arounds seedlings, minimizing disease
- Don’t forget to label your seedlings!
Damping Off– Damping Off is when young plants wither at the soil level and then topple over, which is caused by a common fungus called pythium. The spores of the fungus require cool, wet soil in order to infect plant tissues.
Prevention & Control:
- Use well drained seed starting soil, allow the soil to become relatively dry between waterings
- Avoid sowing seeds to thickly
- Most seedlings require 15 hours of light
- Sprinkle a layer of perlite over soil surface to keep seedling stems dry
- Water containers from the bottom rather than overhead. Do NOT let water sit in the trays
- Provide air circulation! Have a low-speed fan running to keep air circulating gently around young plants and across the soil surface
- Use Cinnamon!! Cinnamon is a natural antifungal. Sprinkle on top of the soil at the first sign of damping off or right from the first of planting
Thinning– Once your seedlings have a set of their true leaves its time to thin them
Keep your largest healthiest seedling and gently cut (at base of soil) off the other seedlings in that cell.
Do not pull out or try and separate them as you will damage their tender root systems!
Fertilizer– Once your seedlings have been up for a week, they need a weak application of an organic fertilizer such as a seaweed fertilizer.
They can be fertilized once every week or two.
Use bottom watering method or in a gentle spray bottle
Transplanting–
- Once your seedlings have out grown their cells, plant them in individual pots to mature further until its time to plant them outdoors.
- Be gentle when transplanting and always push from the bottom of the cells instead of pulling upwards on the seedling.
- Fill the new pot with soil and make a nice large hole in soil, gently put your seedling in the pot, press soil around it and water. Move to an area of indirect sunlight for a day or two to prevent transplant shock, then put back in a sunny location.
- If you used Jiffy Pellets you can tear the netting a little bit to help roots grow through easily.
- After transplanting do NOT fertilize for one week!
- Some larger variety plants, like tomatoes may require being transplanted again before its time to be planted outside. It is better to do this than pick too large of a pot at time of first transplanting.
Fertilizer– Now you can start fertilizing with a water soluble Transplanter Fertilizer such as a 10-52-10.
This has a high Phosphorous analysis which encourages strong and rapid root development, and also can help with transplant shock when time comes to plant outside. Use as directed on package.
Hardening Off– When the temperatures outside are right you can begin hardening off your seedlings. This process entails placing the plants outside (out of direct sunlight) during the day and bringing them back in at night. Gradually increase the amount of time and level of light that they are exposed too over the first week.
This process will acclimatize them to sunlight and their outside environment.
Transplanting Outdoors– Once the risk of frost has past, generally after the full moon in June, you can transplant your seedlings into the garden.
- Cold weather crops can be planted outside much earlier then others, these include lettuce, broccoli, cabbage, onions and peas.
- When planting in the garden or large pots, make sure to only plant to the original soil level it was in its pot. Do not bury any higher up stem, the only exception being tomatoes.
- Keep plants watered well, especially as the weather gets hotter and fertilize regularly with a Vegetable Fertilizer as directed.
- Amend soil as required with a nice top dressing of compost or worm castings.
Happy Gardening!

Step 3: Grid your Bed
Grids can be made inexpensively with wood lath sold in home improvement stores, string or even wooden yardsticks.
The grid is one of the most important features of a Square Foot Garden.
The grid lets you clearly see how to space your seeds/plants and keeps your garden looking neat and organized. Mark your garden off in 1 sq ft grids.


Planting:
Some vegetables need one full square per plant, other vegetables you can plant 16 per square.
Companion Planting:
Companion planting is the practice of growing different plants together for mutual benefit.
It is best defined as the practice of planting different plant species in close proximity so that they can offer identifiable benefits to one another. There are numerous benefits to companion planting.
Sometimes the benefit is one-sided, with one plant selflessly offering most of the partnership advantages to the other. In other cases, the benefit is mutual, with each plant enhancing the other’s health or vigor.
Plants can attract beneficial insects and pollinators, deter pests, and act as insect repellants. They can fend off predators and undesirable wildlife. Raccoons, for instance, dislike the smell of cucumbers.
Three Sisters Garden:
Corn, pole beans, and squash:
Corn, with its sturdy stems, provides upright support for climbing beans. For their part, the pole beans fix nitrogen in the soil, providing essential nutrients for all three sisters.
And the large leaves of the ground-dwelling squash shade the soil, retain moisture, and block out weeds.
Cucumbers, sunflowers, and pole beans:
The principle here is the same as for the three sisters: the sunflower provides support for climbing pole beans, while cucumber vines shield the ground.
Garden Friends:
- Basil and tomatoes: These can be considered “best friends” in the garden. Basil repels thrips and disrupts the habits of the moths that cause tomato hornworms.
- Sage, with carrots or cabbage. Sage is a proven repellant for carrot flies and cabbage moths.
- Parsley and tomatoes:Parsley attracts beneficial insects that help keep control of damaging insects that prey on tomato plants.
- Nasturtiums: This plant lures hungry caterpillars away from brassicas, including cabbage, broccoli, and kale.
- Mint: This plant has an odor that strongly repels aphids, ants, and flea beetles.
- Garlic:This onion relative has a strong scent that is repugnant to aphids and all repels a variety of mites, moths, and beetles.
- Dill: This plant is known to attract ladybugs, which are voracious eaters of damaging aphids and spider mites.
Garden Enemies:
Just as there are plants that make good neighbors, there are plenty of opportunities to plant bad neighbors.
Generally, plants that compete because of similar nutrient needs, water, space—aboveground growth and belowground root systems—as well as sunlight should not be planted next to each other.
Crops that are susceptible to the same plant disease, such as blight, should be kept as far as possible from each other to prevent it from spreading. The same applies to pests.
Some crops can inhibit the growth of other plants.
Fennel is often offered as an example of a poor companion plant that
should be given its own spot in the garden far away from all other crops.
- Onions, garlic, leeks, and shallots can stunt the growth of plants like pole beans and peas.
- Corn and tomatoes are both susceptible to fungal infections and if one gets it, the other one will too.
- Broccoli and Cauliflower won’t do well near peppers, tomatoes, squashes, or strawberries. Technically if you really enrich your soil they can be friends, but in general, brassicas soak up all the nutrients in the soil which makes it hard for other nutrient-needing plants to thrive.
- All types of pole beans can cause problems for plants like peppers (all varieties) and even beets. These combinations don’t work well because they compete for resources. These are vegetables that should not be planted together.
- Asparagus does not want to hang out with onions, garlic, or potatoes.
- Cucumbers, melons, squash, turnips, all fall victim to the potato and its competition for nutrients and moisture. Even members of the potato family, like the tomato, shouldn’t be near the potato because they slow the growth of each other and can be more susceptible to potato blight (Phytophthora).
- Don’t plant carrots next to dill because they’re from the same family of plants which causes them to cross-pollinate. This ends up stunting the growth of the carrots. Similarly, carrots should not be planted next to turnips.


Delivery in the Saint John area
*cost depending on location.


